Tokenization - Android
Learn how to build a tokenization form for your Android app to accept payment details securely.
This article details how to build a tokenization form for your Android app. The payment details buyers submit in the tokenization form are secured via tokenization and stored in Finix's vault, so payment information is never exposed and minimizes your PCI scope.
If you have questions about building your app's tokenization form, reach out to your Finix point of contact or email the Finix Support team.
Prerequisites
The library is built 100% on Kotlin utilizing the Jetpack Compose library for the UI. A demo app is available in the following Github repo: Finix Android Payment Sheet app.
We host the library on Maven Central, so verify you have mavenCentral() in your buildscript inside the build.gradle project.
buildscript {
 repositories {
    mavenCentral()
 }
}
After you confirm Maven Central is in your buildscript, you can import our library by adding the following to your gradle file:
buildscript {
    ext.finix_version = '0.3.7'
}

dependencies {
    implementation 'com.finix:finix-android-payment-sheet:finix_version'
}
Step 1: Create a Kotlin File
Create a new Kotlin file and save it with the .kt extension.
Next, create a function to handle the tokenization form. You can define it using the following:
@Composable
fun showMyPaymentSheet() {
    CompletePaymentSheetOutlined(
        onDismiss = { /*TODO*/ },
        onNegativeClick = { /*TODO*/ },
        onPositiveClick = { token -> }
    )
}
Step 2: Launch the Tokenization Form
Using the viewModel, you can control when exactly the tokenization form is called on the MainCheckOutScreen and prompts the buyer to enter their information.
Add in the relevant logic so the tokenization form gets called when you'd want your buyers to enter their information:
@Composable
fun MainCheckOutScreen() {
    val viewModel = viewModel<CheckOutViewModel>()
    val state = viewModel.state

    if(state.showMyPaymentSheet ) {
            showMyPaymentSheet()
    }

}
When the tokenization form is returned successfully, save the token response contained in onPositiveClick:
onPositiveClick = { token ->
    viewModel.saveTokenResponse(token)
}
It contains the results of the tokenization request and the buyer's tokenized payment details.
The structure of the token is:
data class TokenizedResponse(
    val id:String?,
    val fingerprint:String?,
    val createdAt:String?,
    val updatedAt:String?,
    val type:String?,
    val expiresAt:String?,
    val currency:String?,
)
For a detailed example of how to use our Android tokenization library, see the following GitHub repo: Finix Android Payment Sheet app.
Step 3: Create a Payment Instrument
With the token saved, you're ready to process a transaction. Before you can use the tokenized details in a transaction, you must create a Payment Instrument.
Make a POST request to the /payment_instrument endpoint and create a Payment Instrument with the relevant token and Identity information.
The token to use is available in the TokenResponse. The structure of the TokenResponse is:
id: \(instrument.id)
fingerprint: \(instrument.fingerprint)
created: \(instrument.created)
updated: \(instrument.updated)
instrument: \(instrument.instrument)
expires: \(instrument.expires)
isoCurrency: \(instrument.isoCurrency)
attention
Use new tokens immediately to create a Payment Instrument. Tokens expire 30 minutes after being created.
curl https://finix.sandbox-payments-api.com/payment_instruments \
    -H "Content-Type: application/json" \
    -H 'Finix-Version: 2022-02-01' \
    -u  USsRhsHYZGBPnQw8CByJyEQW:8a14c2f9-d94b-4c72-8f5c-a62908e5b30e \
    -d '
        {
            "token": "TKghUufLdh4QQ96CBi928HP3",
            "type": "TOKEN",
            "identity": "IDgWxBhfGYLLdkhxx2ddYf9K"
        }'
HTTP Request
POST https://finix.sandbox-payments-api.com/payment_instruments
Request Arguments
| Field | Type | Description |
address |
object, required | Billing address (Full description of child attributes below) Note: Including a postal or zip code when creating a Payment Instrument can lower the interchange on credit card transactions |
identity |
string, required | ID for the Identity resource which the account is to be associated |
name |
string, required | Full name of the registered card holder |
token |
string, required | ID for the Token that was returned via the tokenization client |
type |
string, required | Must pass TOKEN as the value |
Address-object Request Arguments
| Field | Type | Description |
city |
string, optional | City (max 20 characters) |
country |
string, optional | 3-Letter Country code |
line1 |
string, optional | First line of the address (max 35 characters) |
line2 |
string, optional | Second line of the address (max 35 characters) |
postal_code |
string, required | Zip or Postal code (max 7 characters) |
region |
string, optional | 2-letter State code |
Example Response
{
    "id": "PImmCg3Po7oNi7jaZcXhfkEu",
    "created_at": "2022-10-10T05:32:17.78Z",
    "updated_at": "2022-10-10T05:35:04.55Z",
    "application": "APgPDQrLD52TYvqazjHJJchM",
    "created_via": "API",
    "currency": "USD",
    "enabled": true,
    "fingerprint": "FPRiCenDk2SoRng7WjQTr7RJY",
    "identity": "IDgWxBhfGYLLdkhxx2ddYf9K",
    "instrument_type": "PAYMENT_CARD",
    "address": {
        "line1": "900 Metro Center Blv",
        "line2": null,
        "city": "San Francisco",
        "region": "CA",
        "postal_code": "94404",
        "country": "USA"
    },
    "address_verification": "POSTAL_CODE_AND_STREET_MATCH",
    "bin": "520082",
    "brand": "MASTERCARD",
    "card_type": "DEBIT",
    "expiration_month": 12,
    "expiration_year": 2029,
    "issuer_country": "NON_USA",
    "last_four": "8210",
    "name": "Amy White",
    "security_code_verification": "MATCHED",
    "tags": {
        "card_name": "Business Card"
    },
    "type": "PAYMENT_CARD",
    "_links": {
        "self": {
            "href": "https://finix.sandbox-payments-api.com/payment_instruments/PImmCg3Po7oNi7jaZcXhfkEu"
        },
        "authorizations": {
            "href": "https://finix.sandbox-payments-api.com/payment_instruments/PImmCg3Po7oNi7jaZcXhfkEu/authorizations"
        },
        "transfers": {
            "href": "https://finix.sandbox-payments-api.com/payment_instruments/PImmCg3Po7oNi7jaZcXhfkEu/transfers"
        },
        "verifications": {
            "href": "https://finix.sandbox-payments-api.com/payment_instruments/PImmCg3Po7oNi7jaZcXhfkEu/verifications"
        },
        "application": {
            "href": "https://finix.sandbox-payments-api.com/applications/APgPDQrLD52TYvqazjHJJchM"
        },
        "identity": {
            "href": "https://finix.sandbox-payments-api.com/identities/IDgWxBhfGYLLdkhxx2ddYf9K"
        },
        "updates": {
            "href": "https://finix.sandbox-payments-api.com/payment_instruments/PImmCg3Po7oNi7jaZcXhfkEu/updates"
        }
    }
}
Step 4: Processing Live Transactions
When you've completed testing, you can take your tokenization form live by making the following changes:
-
Set
sandboxto false -
Add your
Application_id
@Composable
    fun showMyPaymentSheet(viewModel: CheckOutViewModel) {
        CompletePaymentSheetOutlined(
            onDismiss = { viewModel.setShowMyPaymentSheet(false) },
            onNegativeClick = { viewModel.setShowMyPaymentSheet(false) },
            onPositiveClick = { token ->
                viewModel.saveTokenResponse(token)
                viewModel.setShowMyPaymentSheet(false)
            },
            applicationId = MY_APPLICATION_ID,
            isSandbox = false,
        )
    }
Taking your tokenization form live will process real money movements. For details on how to take your sandbox live, see Signing Up for a Finix Account.
Customize Tokenization Forms
You can customize several parts of the tokenization forms to match your brand and voice.
Style
There are two styles available for your app's tokenization form:
- OutlinedTextField has text fields with rounded corners.
- ClassicTextField has text fields with square corners and is boxier.
Tokenization Form Styles
| OutlinedTextField | ClassicTextField |
|---|---|
 |
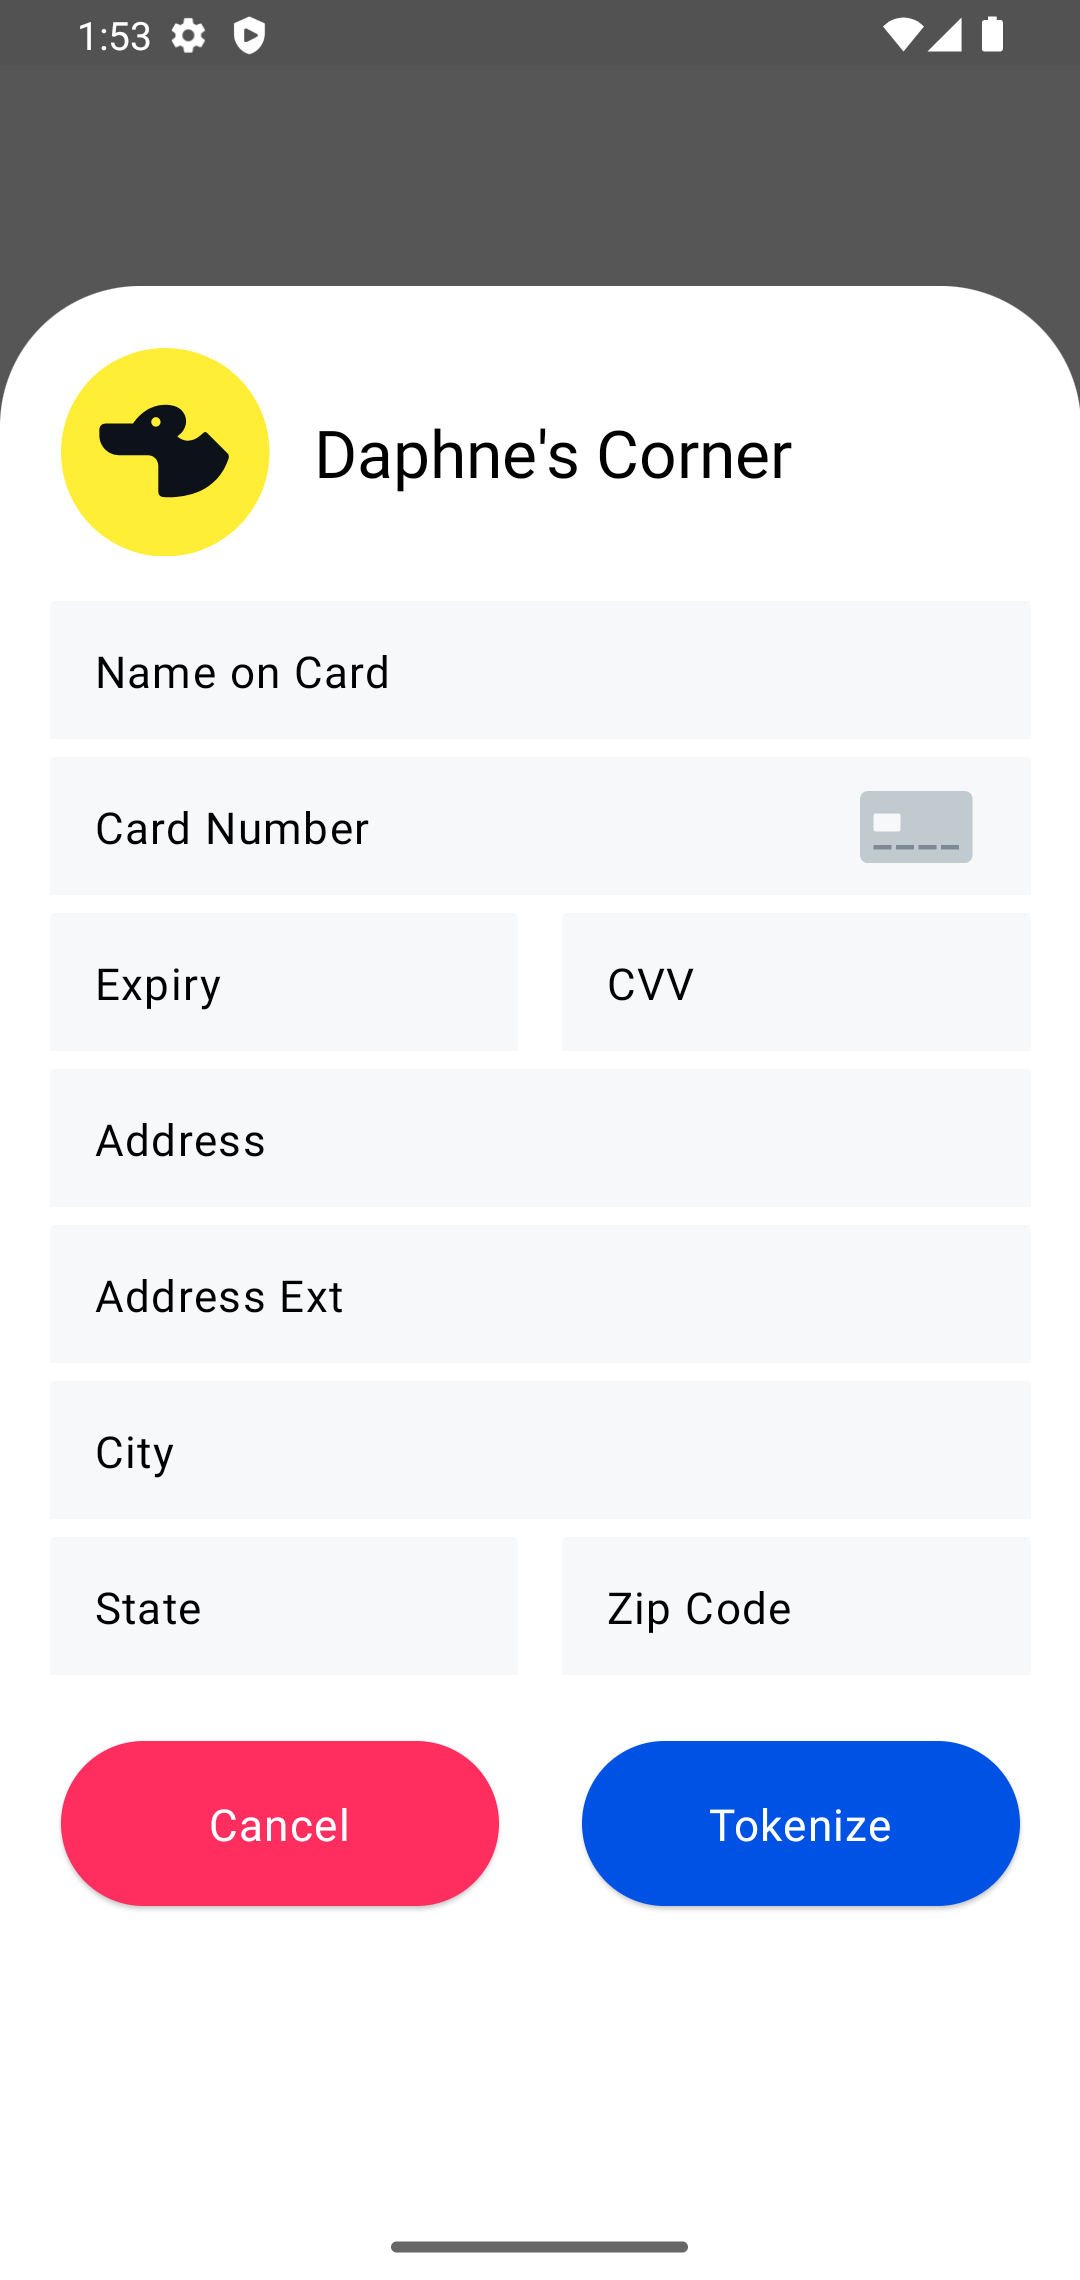 |
Once you’ve selected a style, decide on how much information the Tokenization Form should request from buyers.
- Collect the most information to reduce fraud via Card and AVS checks.
- Collect less information to speed up the cardholder experience.
For more details on the different Card and AVS checks, see Card and Address Verification Checks.
Types of Tokenization Forms
Several tokenization forms are available to choose from that differ in how much information is requested. We recommend using either the Complete or Partial tokenization form for most use cases.

Tokenization Form Types
| Information Collected | COMPLETE sheet | PARTIAL sheet | BASIC sheet | MINIMAL sheet | INTERNATIONAL sheet | BANK ACCOUNT sheet |
|---|---|---|---|---|---|---|
| ClassicTextField Function Name | CompletePaymentSheet | PartialPaymentSheet | BasicPaymentSheet | MinimalPaymentSheet | InternationalPaymentSheet | BankAccountSheet |
| OutlinedTextField Function Name | CompletePaymentSheetOutlined | PartialPaymentSheetOutlined | BasicPaymentSheetOutlined | MinimalPaymentSheetOutlined | InternationalPaymentSheetOutlined | BankAccountSheetOutlined |
| Name | X | X | X | |||
| Card | X | X | X | X | ||
| Expiration Date | X | X | X | X | ||
| CVV | X | X | X | X | X | |
| Address | X | |||||
| Address Ext. | X | |||||
| City | X | |||||
| State | X | |||||
| ZIP/Postal Code | X | X | X | |||
| Country and Region | ||||||
| Accounting Number | X | |||||
| Routing Number | X |
Customizing Tokenization Forms
Once you’ve chosen a tokenization form, you can begin customizing it to fit the look and feel of your application.
The complete list of items you can add to the tokenization form includes the following:
@Composable
fun CompletePaymentSheetOutlined(
    modifier: Modifier = Modifier,
    applicationId: String = "",
    isSandbox: Boolean = true,
    paymentSheetResources: PaymentSheetResources = PaymentSheetResources(),
    paymentSheetColors: PaymentSheetColors = PaymentSheetColors(),
    logoTextStyle: TextStyle = MaterialTheme.typography.headlineSmall,
    textStyle: TextStyle = LocalTextStyle.current,
    buttonTextFont: TextUnit = BUTTON_TEXT_FONT,
    onDismiss: () -> Unit,
    onNegativeClick: () -> Unit,
    onPositiveClick: (TokenizedResponse) -> Unit
)| Parameter | Type | Default | Description |
|---|---|---|---|
applicationID |
String, optional | none | Update this to your Application#id, so you can manage the tokens. If not included, you won't be able to create Payment Instruments with the results of the sheet. |
isSandbox |
Boolean, optional | true (Sandbox) | Update this to false if you want to create tokens in a live environment. |
paymentSheetResources |
object, optional | See below | Add custom images and text to the tokenization form. |
paymentSheetColors |
object, required | See below | Customize the colors of the tokenization form. |
logoTextStyle |
TextStyle, required | MaterialTheme.typography.headlineSmall |
Configure the styling of the text in the logo. |
textStyle |
TextStyle, required | LocalTextStyle.current |
Configure the styling of the text in the input fields. |
PaymentSheetResources
data class PaymentSheetResources(
    @DrawableRes val logoDrawable: Int = R.drawable.ic_default_logo,
    @StringRes val logoText: Int = R.string.default_logo_text,
    @StringRes val tokenizeButtonText: Int = R.string.btn_tokenize,
    @StringRes val cancelButtonText: Int = R.string.btn_cancel,
    val cancelButtonWeight: Float = 0.6f,
    val tokenizeButtonWeight: Float = 0.8f,
)| Parameter | Type | Default | Description |
|---|---|---|---|
logoDrawable |
int, required | Defaults to a logo for Daphne's Corner. | The image at the top of the tokenization form. Replace this with your own logo. The uploaded logo will have a 76.dp radius. |
logoText |
int, required | Daphne’s Corner | The header to the right of logoDrawable. Update this with your company name or the name of the tokenization form. The header will be centered on the page. |
tokenizeButtonText |
int, required | Tokenize | The text inside the button buyers press to submit the sheet. |
cancelButtonText |
int, required | Cancel | The text buyers press to leave the tokenization form. |
tokenizeButtonWeight |
float, required | Tokenize | Control the spacing of the Tokenize button. |
cancelButtonWeight |
float, required | Cancel | Control the spacing of the Cancel button. |
PaymentSheetColors
data class PaymentSheetColors(
    val surface: Color = Color.White,
    val logoTextColor: Color = Color.Black,
    val textColor: Color = Color.Black,
    val errorContainerColor: Color = FinixErrorTextSurface,
    val containerColor: Color = FinixGray,
    val focusedIndicatorColor: Color = FinixBlue,
    val unfocusedIndicatorColor: Color = Color.Transparent, //hide the indicator
    val focusedLabelColor: Color = FinixBlue,
    val unfocusedLabelColor: Color = Color.Black,
    val placeholderColor: Color = FinixPlaceHolderTextGray,
    val errorIndicatorColor: Color = FinixErrorRed,
    val errorLabelColor: Color = FinixErrorRed,
    val errorPlaceholderColor: Color = FinixPlaceHolderTextGray,
    val tokenizeButtonColor: Color = FinixBlue,
    val tokenizeButtonTextColor: Color = Color.White,
    val cancelButtonColor: Color = FinixRed,
    val cancelButtonTextColor: Color = Color.White,
)| Name | Type | Default | Description |
| surface | Color, Required | Color.White | The color of the tokenization form background. |
| logoTextColor | Color, Required | Color.Black | The color of the title text. |
| textColor | Color, Required | Color.Black | The color of the input text used in text fields. |
| containerColor | Color, Required | FinixGray | The surface color of the textfield. |
| errorContainerColor | Color, Required | FinixErrorTextSurface | The surface color of the textfield when there's an error. |
| errorBorderColor | Color, Required | FinixErrorRed | The color of the textfield border when there's an error. |
| focusedIndicatorColor | Color, Required | FinixBlue | The color of the textfield border when the field is active. |
| unfocusedIndicatorColor | Color, Required | Color.Transparent | The color of the textfield border when the field is inactive and not being used. |
| focusedLabelColor | Color, Required | FinixBlue | The color of the textfield label when the field is active. |
| unfocusedLabelColor | Color, Required | Color.Black | The color of the textfield label when the field is inactive and not being used. |
| errorLabelColor | Color, Required | FinixErrorRed | The color of the textfield label when there's an error. |
| placeholderColor | Color, Required | FinixPlaceHolderTextGray | The color of the textfield placeholder. |
| tokenizeButtonColor | Color, Required | FinixBlue | The surface color of the tokenize button. |
| tokenizeButtonTextColor | Color, Required | Color.White | The color of the text in the tokenize button. |
| cancelButtonColor | Color, Required | FinixRed | The surface color of the cancel button |
| cancelButtonTextColor | Color, Required | Color.White | The color of the text in the cancel button. |
Debugging Tokenization Forms
Our Android tokenization library uses the following libraries and dependencies:
android {

    ...

    compileSdk 33
    defaultConfig {
        minSdk 24
        targetSdk 33


        aarMetadata {
            minCompileSdk = 24
        }
    }

    ....

    kotlinOptions {
        jvmTarget = 11
    }

    buildFeatures {
        compose true
    }

    composeOptions {
        kotlinCompilerExtensionVersion '1.4.0-alpha02'
    }

}| Name | Version |
| Kotlin | org.jetbrains.kotlin:kotlin-bom:1.8.10 |
| Kotlin Compose | androidx.compose:compose-bom:2023.01.00 |
| Kotlin Complier | kotlinCompilerExtensionVersion '1.4.0-alpha02' |
| Material3 |
|
Before using our Android Tokenization library, verify you're using a compatible versions of our SDK and have a compatible version of Kotlin installed:
-
minSdk: 24 -
targetSdk: 33 -
compileSdk: 33
If you run into any issues, verify you have the minimum or latest version of the relevant dependency installed. For details on how to update any of the above, see: Compose to Kotlin Compatibility Map.
If you continue to run into issues, please feel free to reach out to the Finix Support Team.