The Finix iOS Device SDK enables your sellers to accept payments using your iOS application and a payment terminal.
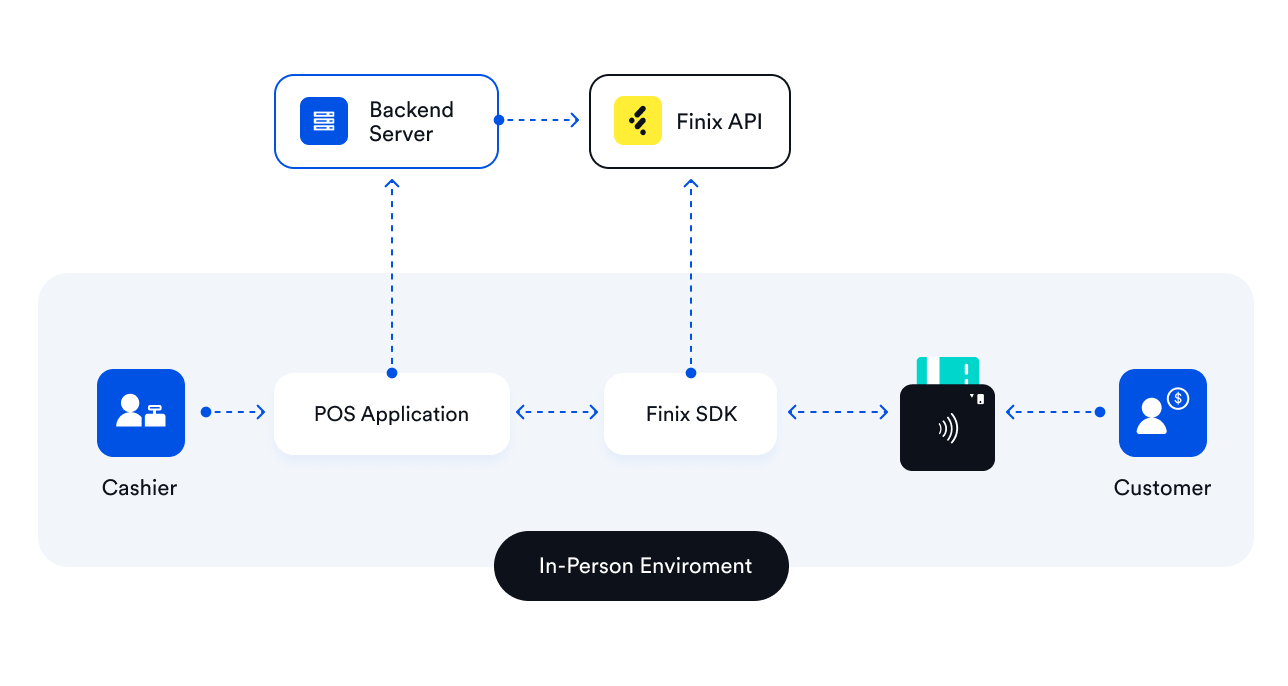
When you process payments with Finix and an iOS app, there are five main components:
- Your iOS point of sale application.
- The backend infrastructure which supports your iOS app.
- The iOS Device SDK.
- Finix's API.
- A pre-certified BBPOS Chipper 2X payment terminal.
Since this solution is pre-certified with major card networks, you can integrate and deploy quickly while remaining secure and without having to perform any extra network certifications.
Payment Terminal
The iOS Device SDK works with BBPOS Chipper 2X payment terminals. These lightweight pre-certified payment terminals can accept payments from all major card brands and supports multiple card entry modes (e.g., Contactless, Chip, Magstripe, NFC wallets like Google Pay/Apple Pay, etc.).
The payment terminal provides end-to-end encryption by encrypting the sensitive card data as soon as the card information is read.
iOS Device SDK Overview
Take the following steps to integrate your point of sale iOS application with the Finix iOS SDK:
| Step | Platform Component | Finix Component | Description |
|---|---|---|---|
| 1. Onboard Merchants | Your platform's backend. | Finix's API | Onboard merchants and set up their point-of-sale devices to accept in-person payments (also known as Card Present transactions). |
| 2. Pair Terminals to Device Profiles | POS iOS application | Finix iOS Device SDK | Initialize the iOS Device SDK and connect (or disconnect) BBPOS payment terminals to point of sale device profiles. |
| 3. Accept In-Person Payments | POS iOS application | Finix iOS Device SDK | Enable the POS iOS application to accept in-person payments. |
| 4. Post Payments Experience | POS iOS application | Finix iOS Device SDK | Manage refunds, settlements, reports, and more. |
The iOS Device SDK facilitates communication between your point of sale application, the payment terminal, and the Finix API.
Step 1: Onboard Merchants
To use the Finix Device SDK you must create aMerchant specifcally for point of sale payments. This includes creating an Identity resource and:
- Provisioning the
Merchantfor in-person payments. - Creating the necessary Finix credentials for that
Merchant. - Creating a
Deviceresource for the POS sale device theMerchantwill use.
Merchant only.Step 1a: Provision Merchant
After you've created anIdentity, you can provision your seller for in-person payments. To provision a seller send a POST request to /identities/IDENTITY_ID/merchants. After provisioning the seller, you get a Merchant ID that starts with "MUxxx".curl https://finix.sandbox-payments-api.com/identities/IDuWtgdP9VERb4FiLeYatWy/merchants \
-H "Content-Type: application/json" \
-H 'Finix-Version: 2022-02-01' \
-u "USjHFGYvecE4LBitYG8KDE2g:b698f403-d9b7-4157-82d8-162cea8c8cc3" \
-d '
{
"gateway": "TRIPOS_MOBILE_V1",
"processor": "VANTIV_V1"
}'URL Parameters
| Parameter | Description |
|---|---|
| :IDENTITY_ID: | ID of the Identity. |
Request Arguments
| Field | Type | Description |
|---|---|---|
gateway | string, required |
|
processor | string, required |
|
tags | object, optional | Key value pair for annotating custom meta data (e.g. order numbers). |
Example Response
{
  "id" : "MU4SUi7ZpghWZ6bar4SjusWb",
  "created_at" : "2022-10-10T06:03:32.39Z",
  "updated_at" : "2022-10-10T06:03:32.39Z",
  "application" : "APeUbTUjvYb1CdPXvNcwW1wP",
  "card_cvv_required" : false,
  "card_expiration_date_required" : true,
  "convenience_charges_enabled" : false,
  "creating_transfer_from_report_enabled" : false,
  "default_partial_authorization_enabled" : false,
  "fee_ready_to_settle_upon" : "RECONCILIATION",
  "gross_settlement_enabled" : false,
  "identity" : "IDuWtgdP9VERb4FiLeYatWy",
  "level_two_level_three_data_enabled" : false,
  "mcc" : null,
  "merchant_name" : null,
  "merchant_profile" : "MP8eDsxwLS2hBdHpgAHrHWMm",
  "mid" : null,
  "onboarding_state" : "PROVISIONING",
  "processing_enabled" : false,
  "processor" : "VANTIV_V1",
  "processor_details" : { },
  "ready_to_settle_upon" : "RECONCILIATION",
  "rent_surcharges_enabled" : false,
  "settlement_enabled" : false,
  "settlement_funding_identifier" : "UNSET",
  "surcharges_enabled": false,
  "tags" : { },
  "verification" : "VI3dEyz1wfuLmLtAMnWFcKqj",
  "_links" : {
    "self" : {
      "href" : "https://finix.sandbox-payments-api.com/merchants/MU4SUi7ZpghWZ6bar4SjusWb"
    },
    "identity" : {
      "href" : "https://finix.sandbox-payments-api.com/identities/IDuWtgdP9VERb4FiLeYatWy"
    },
    "verifications" : {
      "href" : "https://finix.sandbox-payments-api.com/merchants/MU4SUi7ZpghWZ6bar4SjusWb/verifications"
    },
    "merchant_profile" : {
      "href" : "https://finix.sandbox-payments-api.com/merchant_profiles/MP8eDsxwLS2hBdHpgAHrHWMm"
    },
    "application" : {
      "href" : "https://finix.sandbox-payments-api.com/applications/APeUbTUjvYb1CdPXvNcwW1wP"
    },
    "verification" : {
      "href" : "https://finix.sandbox-payments-api.com/verifications/VI3dEyz1wfuLmLtAMnWFcKqj"
    }
  }
}
Get the Provisioning Status
It can take up to 20 minutes to successfully provision a merchant. Fetch theonboarding_state of the Merchant to check the status of the provisioning request (or wait for a webhook notification).Once provisioned, the
onboarding_state of the Merchant updates to APPROVED.curl https://finix.sandbox-payments-api.com/merchants/MU4SUi7ZpghWZ6bar4SjusWb \
-H "Content-Type: application/json" \
-H 'Finix-Version: 2022-02-01' \
-u "USjHFGYvecE4LBitYG8KDE2g:b698f403-d9b7-4157-82d8-162cea8c8cc3" Example Response
{
  "id" : "MU4SUi7ZpghWZ6bar4SjusWb",
  "created_at" : "2022-10-10T06:03:32.39Z",
  "updated_at" : "2022-10-10T06:04:01.64Z",
  "application" : "APeUbTUjvYb1CdPXvNcwW1wP",
  "card_cvv_required" : false,
  "card_expiration_date_required" : true,
  "convenience_charges_enabled" : false,
  "creating_transfer_from_report_enabled" : false,
  "default_partial_authorization_enabled" : false,
  "fee_ready_to_settle_upon" : "RECONCILIATION",
  "gross_settlement_enabled" : false,
  "identity" : "IDuWtgdP9VERb4FiLeYatWy",
  "level_two_level_three_data_enabled" : false,
  "mcc" : null,
  "merchant_name" : null,
  "merchant_profile" : "MP8eDsxwLS2hBdHpgAHrHWMm",
  "mid" : null,
  "onboarding_state" : "PROVISIONING",
  "processing_enabled" : false,
  "processor" : "VANTIV_V1",
  "processor_details" : {
    "acceptor_id" : "5998737400656",
    "accepted_cards" : "[{type=Visa}, {type=MasterCard}, {type=Discover, attributes=[{name=Acquired, value=Yes}, {name=null, value=null}]}, {type=AmericanExpress, attributes=[{name=AmexProgram, value=OptBlue}, {name=ReceiveOptBlueMarketing, value=No}, {name=null, value=null}]}]",
    "default_terminal_id" : "X6600026601",
    "mid" : "5998737400656",
    "account_token" : "04F4C1136F0C3EF3BEC98FE0704659029118DC5CD4A2875BD8020AFB97B50F41BB7E0A01",
    "account_id" : "1052250",
    "merchant_ident_string" : "5998737400656",
    "id" : "192549926",
    "vantiv_merchant_id" : "5998737400656"
  },
  "ready_to_settle_upon" : "RECONCILIATION",
  "rent_surcharges_enabled" : false,
  "settlement_enabled" : false,
  "settlement_funding_identifier" : "UNSET",
  "surcharges_enabled": false,
  "tags" : { },
  "verification" : "VI3dEyz1wfuLmLtAMnWFcKqj",
  "_links" : {
    "self" : {
      "href" : "https://finix.sandbox-payments-api.com/merchants/MU4SUi7ZpghWZ6bar4SjusWb"
    },
    "identity" : {
      "href" : "https://finix.sandbox-payments-api.com/identities/IDuWtgdP9VERb4FiLeYatWy"
    },
    "verifications" : {
      "href" : "https://finix.sandbox-payments-api.com/merchants/MU4SUi7ZpghWZ6bar4SjusWb/verifications"
    },
    "merchant_profile" : {
      "href" : "https://finix.sandbox-payments-api.com/merchant_profiles/MP8eDsxwLS2hBdHpgAHrHWMm"
    },
    "application" : {
      "href" : "https://finix.sandbox-payments-api.com/applications/APeUbTUjvYb1CdPXvNcwW1wP"
    },
    "verification" : {
      "href" : "https://finix.sandbox-payments-api.com/verifications/VI3dEyz1wfuLmLtAMnWFcKqj"
    }
  }
}
Step 1b: Create Merchant Credentials
All Finix Device SDK calls require ROLE_MERCHANT or ROLE_PARTNER credentials. Once created, you can use these credentials across multiple devices.
curl https://finix.sandbox-payments-api.com/identities/IDuWtgdP9VERb4FiLeYatWy/users \
-H "Content-Type: application/json" \
-H 'Finix-Version: 2022-02-01' \
-u "USjHFGYvecE4LBitYG8KDE2g:b698f403-d9b7-4157-82d8-162cea8c8cc3" \
-d '{}'
HTTP Request
GET https://finix.sandbox-payments-api.com/identiities/:IDENTITY_ID:/usersURL Parameters
| Parameter | Description |
|---|---|
| :IDENTITY_ID: | ID of the Identity. |
Example Response
{
  "id" : "USxxxxxxxxxxxxxxxxxxxxxx",
  "created_at" : "2022-10-10T06:05:08.11Z",
  "updated_at" : "2022-10-10T06:05:08.11Z",
  "enabled" : true,
  "identity" : "IDxxxxxxxxxxxxxxxxxxxxxx",
  "password" : "xxxxxxxxxxxxxxxxxxxxxx",
  "role" : "ROLE_MERCHANT",
  "tags" : { },
  "_links" : {
    "self" : {
      "href" : "https://finix.sandbox-payments-api.com/users/USgymgj1dSkCNxYmZKd9GxQN"
    },
    "applications" : {
      "href" : "https://finix.sandbox-payments-api.com/applications"
    },
    "application" : {
      "href" : "https://finix.sandbox-payments-api.com/applications/APeUbTUjvYb1CdPXvNcwW1wP"
    }
  }
}
Step 1c: Create Device
Once you've provisioned theMerchant , you'll need to create a Device to manage how the payment terminal gets configured. A Device resource represents a payment terminal and is required for merchants to process transactions with Finix.curl https://finix.sandbox-payments-api.com/merchants/MU4SUi7ZpghWZ6bar4SjusWb/devices \
-H "Content-Type: application/json" \
-H 'Finix-Version: 2022-02-01' \
-u "USjHFGYvecE4LBitYG8KDE2g:b698f403-d9b7-4157-82d8-162cea8c8cc3" \
-d '{
"name": "Terminal 1",
"model": "BBPOS",
"description": "John Smith"
}'HTTP Request
POST https://finix.sandbox-payments-api.com/merchants/:MERCHANT_ID:/devicesURL Parameters
| Parameter | Description |
|---|---|
| :MERCHANT_ID: | ID of the Merchant . |
Request Arguments
| Field | Type | Description |
|---|---|---|
description | string, optional | Additional information about the device (e.g. self serving terminal). |
model | string, required | Include BBPOS or LINK_2500 to let Finix know what type of device is being used. |
name | string, required | The display name of the Device used for filtering purposes. |
tags | object, optional | Key value pair for annotating custom meta data (e.g. order numbers). |
Example Response
{
  "id" : "DVdWhYkdEQPurNMX6tzy94CK",
  "created_at" : "2022-10-10T06:06:08.936946Z",
  "updated_at" : "2022-10-10T06:06:08.936946Z",
  "configuration_details" : {
    "allow_debit" : true,
    "check_for_duplicate_transactions" : true,
    "prompt_amount_confirmation" : true,
    "prompt_manual_entry" : false,
    "prompt_signature" : "ALWAYS",
    "signature_threshold_amount" : 0,
    "bypass_device_on_capture" : true
  },
  "description" : "John Smith",
  "enabled" : true,
  "idle_message" : null,
  "merchant" : "MU4SUi7ZpghWZ6bar4SjusWb",
  "model" : "BBPOS",
  "name" : "Terminal 1",
  "serial_number" : null,
  "tags" : { },
  "_links" : {
    "self" : {
      "href" : "https://finix.sandbox-payments-api.com/devices/DVdWhYkdEQPurNMX6tzy94CK"
    },
    "merchant" : {
      "href" : "https://finix.sandbox-payments-api.com/merchants/MU4SUi7ZpghWZ6bar4SjusWb"
    },
    "transfers" : {
      "href" : "https://finix.sandbox-payments-api.com/transfers"
    },
    "authorizations" : {
      "href" : "https://finix.sandbox-payments-api.com/authorizations"
    }
  }
}
Step 2: Pair Terminals
After creating aDevice, you need to install the iOS Device SDK and prepare the payment terminals and your iOS application:- Using the iOS Device SDK, connect the iOS application to a
Devicecreated under the merchant’s Finix account. - Pair the iOS application with a payment terminal.
Install the iOS Device SDK
Ask your Finix point of contact to get access to the iOS Device SDK. Installing the iOS Device SDK depends on thetriPOSMobileSDK.xcframework, which is included.iOS Compatibility
The Finix iOS Device SDK only supports iOS 12 and later.
triPOSMobileSDK.xcframework is included.- Make sure to add it to your project, along with embedding it in your target and linking against it.
- Clone/copy
FinixPOSat the same level of your project.
The XCFramework takes care of updating source code dependencies, so there's no need to update “Framework Search Paths”.
POS iOS App Requirements
Using the iOS Device SDK in an app adds specific dependencies that need to be configured:
Framework Dependencies
The following frameworks must be linked in order to run the iOS Device SDK.
ExternalAccessory.framework- a system library.triPOSMobileSDK.xcframework- must be embedded.FinixPOS.xcframework- must be embedded.
Info.plist
The iOS Device SDK connects to the BBPOS payment terminal using Bluetooth Low Energy (BLE). To support this, the iOS Device SDK requires the following to get added to the application’sInfo.plist to access BLE:- Privacy - Bluetooth Peripheral Usage Description - aka
NSBluetoothPeripheralUsageDescription - Privacy - Bluetooth Always Usage Description - aka
NSBluetoothAlwaysUsageDescription
BLE allows the automatic pairing of a device to an application. Considering this, DO NOT PAIR the terminal manually using the iOS device's Bluetooth Settings.
Your app can't connect to the terminal if it's been manually paired from the iOS device's Settings. If you pair the device via the device's Bluetooth settings, you need to disconnect the terminal from the Bluetooth Settings of your iPad or iPhone.
Once the's iOS Device SDK is installed and added to your project, you can reference the framework by importingFinixPOS.- The iOS Device SDK is a singleton. It can be accessed via the shared instance.
Initializing the SDK
To process payments the iOS Device SDK must be initialized so the SDK instance is connected to aDevice on the merchant’s Finix account and paired over Bluetooth to the payment terminal.Before initializing the SDK, power “ON” the BBPOS payment terminal and place it near the iPad/iPhone. The terminal flashes a blue light when it's in the pairing mode.
- Finix merchant credentials (ROLE_MERCHANT) are required for this step. We recommend storing these credentials on your backend system, so they can be retrieved after you authenticate the merchant.
FinixConfig struct which contains the SDK configuration information. It has the following constructor:init(environment: Finix.Environment,
application: String,
credentials: Finix.APICredentials,
deviceId: String,
deviceType: Finix.Device,
merchantId: String,
version: String,
serialNumber: String? = nil)Parameters
| Parameter | Description |
|---|---|
environment | Sandbox or Live |
application | The application description. |
credentials | Your Finix merchant credentials. They should be fetched from your backend service and then used to initialize the iOS Device SDK. |
deviceId | The ID of the Device created for this merchant. Use the ID returned when creating a Device. |
deviceType | The type of the payment terminal. Set to BBPOS |
merchantId | The ID of the Merchant . |
version | The application version. |
serialNumber | The serial number of the payment terminal (Optional).
|
syncSDK() call is asynchronous. Don't make any API calls until the operation completes and the handler gets called.After the sync call completes, the payment terminal will begin to scan for devices. The terminal searches for a payment terminal to pair with for one minute. After pairing with a device, the terminal will be ready to process card transactions.
To verify a successful pairing the delegate will receivedeviceDidConnect(_:model:serialNumber:). - You can also check
FinixClient.shared.isReaderConnectedto verify the connection state.
Here is an example initialization:
import FinixPOSNote: To get
credentials and deviceId, your Finix credentials should be fetched from your backend server in order let credentials = Finix.APICredentials(username:TEST_USERNAME, password:TEST_PASSWORD)
let deviceId = TEST_DEVICEIDfunc initializeFinixSDK() {
let config = FinixConfig(environment: .TestCertification,
credentials: credentials,
application: TEST_APPLICATION,
version: TEST_VERSION,
merchantId:TEST_MERCHANTID,
deviceType: .BBPOS,
deviceId: deviceId)Set delegates
   let client = FinixClient.shared
   client.delegate = self
   client.interactionDelegate = self

   client.syncSDK(config:config){ (success, error) in
            guard success == true else {
                print("FinixSDK: failed to initialize with error \(error!)")
                return
            }

            print("FinixSDK: initialized successfully. SDK is ready for use.")
		// listen for delegate to get `deviceDidConnect(_:model:serialNumber:)` before card processing
        }
    }
}delegate gets updated with the card terminal's status (e.g., connection, firmware updates, etc.), while the interactionDelegate gets updated with user prompts for the cardholder during the transactions.While some SDK calls do not require the payment terminal to be connected, most calls need the terminal connected to make a successful request. Confirm these
delegates are set and enabled to ensure no issues come up.De-initialization
Similar to thesyncSDK() call to initialize, use unsyncSDK() to disable the connection. Step 3: Accept In-Person Payments
Now that the payment terminal is connected to the point-of-sale iOS application, your merchant is ready to accept in-person payments.
The iOS Device SDK supports the following in-person use-cases:
| Use-case | Description |
|---|---|
Create an Authorization (capture later) | Authorize funds on the payment card (swiped/dipped/tapped on the payment terminal) and capture the amount later. The capture can be performed either within the SDK or from your backend servers by calling the Finix API. |
| Create a Sale | Create a sale (also called a Transfer) to process a transaction on a card immediately. |
| Process a Refund | Process a credit to a payment card (swiped/dipped/tapped on the payment terminal). |
High-level Overview
With the payment terminal set up, accepting payments with Finix will involve:
- The cashier rings up the total amount of the purchase.
- Point of Sale iOS application initiates the payment request to the iOS Device SDK.
- The iOS Device SDK initiates the sale with the connected payment terminal.
- The cardholder enters, swipes, or taps their card.
- The payment terminal returns encrypted card data to the Finix SDK.
- The iOS Device SDK completes the payment through the Finix API.
- The iOS Device SDK returns the transaction status and the required receipt tags to the point of sale application.
- The POS application records the payment details and the receipt data to the platform backend.
- The POS application provides a receipt to the buyer.
SDK Operations
All the SDK methods provide a completion handler for successes or failures. The handler returns either a success response or an error that contains details of the cause and, if available, the error response.
Here's an example of a signature for a cardAuthorization:func cardAuthorization(_ auth: TransferRequest, completion: @escaping AuthorizationHandler)The completion handler gets defined as:
typealias AuthorizationHandler = (_ response: AuthorizationResponse?, _ error: Error?) -> VoidAuthorization is complete:- A response gets returned if the request is successful.
- A
nilresponse is returned if the request fails, with the error.
Errors
If there is an errorTransferError(status:response:) gets returned with:| Field | Description |
|---|---|
| status | The detailed error reason. Values include:
|
| response | The TransferResponse.
|
Create an Authorization
An Authorization (also known as a card hold) reserves a specific amount on a card to be captured (i.e., debited) at a later date (usually by the end of the day for card-present authorizations).
- We recommend capturing all authorizations using this method to minimize unintended or duplicate payments. You can set your backend system to capture all authorizations at the end of each day if needed. The maximum period for capturing authorizations for in-person payments is two days.
When an authorization is created it produces an Authorization resource:
let authAmount = Currency(amount: 100, code: .USD)
let authTags: ResourceTags = [:]

let authRequest = TransferRequest(amount: authAmount, tags: authTags)

FinixClient.shared.cardAuthorization(authRequest) { auth, error in
    if let error = error {
        // handle error
        print("Error with Authorization: \(error)")
        return
    }
    if let auth = auth {
        // success
        print("Authorization succeeded: \(auth.amount)")
        print("auth id: \(auth.id)")
    }
}Authorizations in Finix, you can Void an Authorization before it's been captured to cancel the transaction.Create a Sale
A sale (also called aTransfer) will process a transaction on a card immediately. Transfers take the same request parameters as an Authorization.A sale can get processed with the following:
let saleAmount = Currency(amount: 100, code: .USD)
let saleTags: ResourceTags = [:]

let saleRequest = TransferRequest(amount: saleAmount, tags: saleTags)

FinixClient.shared.cardSale(saleRequest) { sale, error in
    if let error = error {
        // handle error
        print("Error with sale: \(error)")
        return
    }
    if let sale = sale {
        // success
        print("Sale succeeded: \(sale.amount)")
        print("transfer id: \(sale.id)")
    }
}
Process a Refund
To return funds to a customer after aTransfer has been approved (or after you have already captured an Authorization), you can use a referenced refund or an unreferenced refund:- Referenced refunds can be submitted from your backend systems and does not require the SDK to interact with the payment terminal.
- Unreferenced refunds can get used to return any amount to any card presented to the payment terminal. Since unreferenced refunds aren't tied to a previous
Transfer, Finix doesn't have a way to block multiple returns (accidental or fraudulent). We recommend reconciling these unreferenced refunds with the original purchase in your system, to block any of these issues.
let refundTransferId = TransferId("Trace Id of the transfer")

let refundRequest = RefundRequest(transferId: refundTransferId, amount: refundAmount)

FinixClient.shared.refund(refundRequest) { refund, error in
    if let error = error {
        // handle error
        print("Error with sale: \(error)")
        return
    }
    if let refund = refund {
        // success
        print("Refund succeeded: \(refund.amount)")
        print("transfer id: \(refund.id)")
    }
}
Providing Receipts
Card networks require receipts to have certain data elements for the buyer’s convenience.
After creating a transaction, the iOS Device SDK returns all the data elements required by you to either print or email a receipt to the buyer.
To create receipts,SaleReceipt and RefundReceipt provide all the fields needed to generate a receipt from a card response.SaleReceipt and RefundReceipt both conform to ReceiptProtocol. They are created with the following:SaleReceipt(sale: SaleResponse)SaleReceipt(auth: AuthorizationResponse)RefundReceipt(refund: CardRefundResponse)
Here is an example of the information (not the layout) available in the receipt and where to find the information in the Finix response.
Sample Receipt:

Receipt Data:
| No. | Name | ReceiptProtocol Field |
|---|---|---|
| 1 | Merchant Name & Address | merchantName, merchantAddress |
| 2 | Date & Time | date |
| 3 | Application Label | applicationLabel |
| 4 | Application Identifier | applicationIdentifier |
| 5 | Merchant Id | merchantId |
| 6 | Reference Number | referenceNumber |
| 7 | Account Number | accountNumber |
| 8 | Card brand | cardBrand |
| 9 | Entry Mode | entryMode |
| 10 | Transaction Id | transactionId |
| 11 | Approval Code | approvalCode |
| 12 | Response Code | responseCode |
| 13 | Response Message | responseMessage |
| 14 | Amount | amount |
| 15 | Cryptogram | cryptogram |
| 16 | Transaction Type | transactionType |
Handling Tips
We recommend including all tip amounts in the amount being authorized instead of collecting the tip on the receipt and adding it to the capture amount.
To include tips in the authorized amount, include prompts for the cardholder to add the tip in the initial checkout flow on the point of sale iOS application.
Step 4: Post Payments Experience
The following is available through the Finix API, and we recommend completing these steps (as needed) through your backend system.
| Use-case | Description |
|---|---|
Capture an Authorization | Capture a previous Authorization to complete the payment. |
Void an Authorization | Void an Authorization to remove the hold from the cardholder’s card account. |
| Refund a previous payment | Process a refund (full amount or partial amount) for a previously completed payment through Finix. |
SDK Conventions
Parameters
The request parameters are a struct. Every field needed to make the calls are required.
Currency
TheCurrency object includes an amount denominated in a specific currency. Currently only US Dollars are supported.Completion
Completion handlers take the form of aresponse and error pair. They get used throughout the iOS Device SDK. Before proceeding, check if there’s an error to handle, then check for a successful response. The completion handlers get delivered on the main thread.Transfer Identifier
The transfer identifier is present in responses asID.State
All of the responses contain astate which represents the transfer’s state. Delegates
TheFinixClient supports two delegates:delegatewhich is aFinixDelegateand is primarily concerned with the payment terminal connection and status.interactionDelegate, which is aFinixClientDeviceInteractionDelegate, handles the text displayed to the buyer (provided by the iOS Device SDK) when interacting with the payment terminal (e.g. “Insert/Tap/Swipe Card”).
Canceling Payment Terminal Operation
To cancel a payment terminal operation callstopCurrentOperation() to stop the terminal from waiting for a card.Errors
Errors get returned asError. Where possible a FinixError is returned.Testing
Test cards and test payment terminals are needed to perform sandbox testing and certification with Finix. Please reach out to your Finix point of contact to get the required test cards and test terminals.